
Every failed hydraulic seal leaves evidence. The shape of the damage, its position on the lip, and the condition of the mating metal tell you what happened long before an oil analysis comes back. The problem is that most maintenance teams replace the seal, refill the oil and move on, so the same failure returns in weeks.
We rebuild and re-seal cylinders for customers across construction, agricultural and industrial equipment, and the same ten causes account for nearly every premature failure we see. Below is each one with the physical signature it leaves, grouped by the part of the system that produces it: contamination, heat and chemistry, and mechanical load.
Start With the Damage, Not the Part Number
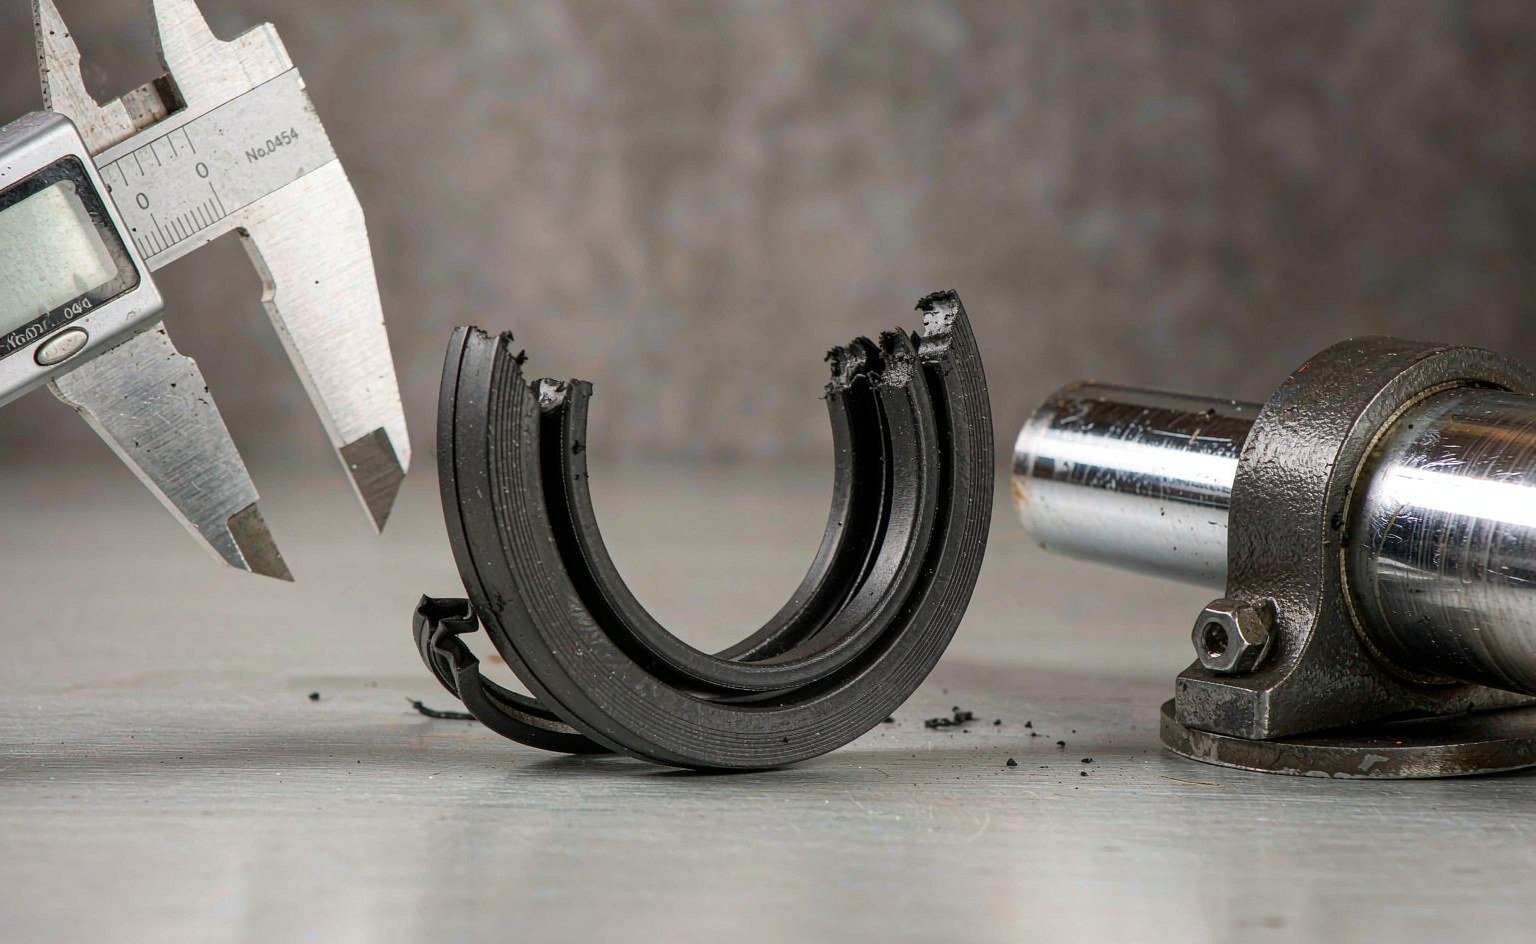
Before ordering a replacement, read the seal you removed. The table below maps the most common appearances to their causes. Photograph the seal before cleaning it; wiping the lip destroys the evidence.
| What you see on the seal | Most likely cause | First thing to check |
|---|---|---|
| One edge nibbled or torn, on the low-pressure side | Extrusion through excessive clearance | Gland clearance and backup ring presence |
| Lip hardened, cracked, glossy or blistered | Over-temperature | Fluid temperature at the cylinder, cooler performance |
| Seal swollen, soft, sticky or blistered | Wrong compound for the fluid | Fluid type and additive package versus material data |
| Uniform wear around the lip, no scoring | Normal service life | Hours logged and oil cleanliness history |
| Wear concentrated on one side of the circumference | Side load or misalignment | Rod runout, bushing wear, cylinder mounting |
| Deep circumferential scratches, metal embedded | Abrasive contamination | Wiper condition, breather, filtration, oil ISO code |
| Flat, set, no resilience when squeezed | Compression set from heat or excessive squeeze | Groove depth and operating temperature |
| Spiral or diagonal cuts across the lip | Installation damage | Assembly technique, groove edge radius, tooling |
| Seal pushed out of its groove | Pressure trapped behind the seal, or missing retaining ring | Drain path and groove retention |
| Black sludge and rubber crumbs in the gland | Advanced degradation, often contamination plus heat | Fluid condition and full system flush |
Group 1: Contamination
1. Abrasive particles in the oil
This is the leading cause of premature seal failure in every fleet study we have seen, and it is almost always self-inflicted. Particles between 4 and 20 µm pass through the gland clearance and act as lapping compound on the seal lip. The seal wears from the outside in, the clearance grows, more particles enter, and the failure accelerates.
The signature is a lip worn uniformly thin with a polished, glazed appearance and fine circumferential scratches on the rod. Oil analysis usually shows an ISO 4406 code above 19/17/14 against a target of 18/16/13 or better. Fixing it means filtration and housekeeping, not a different seal compound.
2. Failed or missing wiper seal
The wiper is the only component that keeps external dirt out of the cylinder. A torn lip, a wiper that has lifted out of its groove, or a wiper deleted during a previous rebuild turns the rod into a conveyor belt for dust and grit. The rod seal then fails within a fraction of its expected life, and the failure is often blamed on the rod seal.
Inspect the wiper at every service interval, not every rebuild. On mobile equipment working in dust, a wiper with a lifted edge should be replaced at the next available stop, not at the next scheduled overhaul. Our wiper seal range covers single and double-lip profiles, including versions with a metal case for high-abrasion duty.
3. Contaminated new oil and dirty assembly
New oil from a drum is not clean oil. It routinely tests two ISO codes dirtier than a system target, so every top-up through an open funnel undoes months of filtration. Assembly adds a second dose: a seal fitted on a bench with grinding dust, or a gland wiped with a shop rag, introduces particles directly into the sealing zone.
The fix is procedural. Filter every litre going into the machine, cap hoses the moment they come off, and assemble on a clean mat with the seals still in their packaging until the moment of fitting.
Group 2: Heat and Chemistry
4. Operating above the compound’s temperature limit
Every elastomer has a ceiling above which it hardens, loses elasticity and takes a permanent set. NBR is comfortable to about 100 °C, PU to about 90 °C, FKM to about 200 °C. A cylinder running at 110 °C with NBR seals will show a hardened, cracked lip and compression set within a few hundred hours, and no installation technique will prevent it. Where the ceiling has to move, HNBR is the usual first step up: Zeon, which commercialised HNBR as Zetpol, publishes the compound grades that most seal moulders work from.
| Material | Continuous range | Short-term peak | Failure signature when exceeded |
|---|---|---|---|
| NBR | −30 to +100 °C | 120 °C | Hard, cracked lip; compression set; dark colour |
| HNBR | −30 to +150 °C | 160 °C | Hardening with less cracking than NBR |
| FKM | −20 to +200 °C | 230 °C | Brittle lip, bluish sheen, deep cracks |
| PU | −30 to +90 °C | 100 °C | Softening, then reversion to a sticky mass |
| PTFE | −200 to +260 °C | 300 °C | Deformation and cold flow rather than cracking |
Measure temperature at the seal, not at the reservoir. A cylinder close to a furnace, a die-casting machine or an engine manifold can run 40 °C hotter than the tank. Where the fluid itself is hot, an air cooler or a larger reservoir solves more than a premium compound does. Where ambient heat is the issue, a heat shield is cheaper than FKM. For fluids that are not plain mineral oil, compatibility charts from distributors such as Darcoid are a useful cross-check against a supplier’s own claims.
5. Wrong compound for the fluid
Seal failure from chemical incompatibility looks different from heat failure: the seal swells, softens, blisters or partially dissolves. NBR in a phosphate-ester fluid swells badly. EPDM in mineral oil disintegrates. PU in water-based fluid hydrolyses and turns chalky. FKM is excellent in most mineral oils and poor in ketones, esters and low-molecular-weight amines.
The failure is easy to prevent and easy to misdiagnose, because a swollen seal can still look intact when removed. Compare the removed seal’s dimensions against a new one: more than about 5% growth in cross-section means absorption, and the compound is wrong regardless of what the data sheet claims. Compound callouts written to ASTM D2000 make that comparison possible; a generic “NBR 70” label does not, because it says nothing about the acrylonitrile content that governs fluid resistance.
6. Contaminated or degraded fluid
Water in oil above roughly 0.1% accelerates oxidation and strips lubricity, and the seal runs dry against the rod. Air entrainment causes cavitation damage and local hot spots. Oxidised oil forms varnish that glues the seal lip to the rod, so the lip tears on the first stroke after a shutdown.
This cause is often invisible on the seal itself. The clue is a system that has had three seal failures in a year across different cylinders, with no common installation error. Sample the fluid before replacing anything a fourth time.
Group 3: Mechanical Load and Design
7. Extrusion through excessive clearance
When pressure pushes the seal into the gap between rod and gland, the material shears off in slivers. The signature is unmistakable: damage concentrated on the low-pressure edge, with a torn or nibbled profile rather than a worn one. It is a design or wear problem, not a material problem.

Two corrections work. Tighten the clearance by replacing the rod bushing or guide ring, or add a backup ring to bridge the gap. Above roughly 160–250 bar, a backup ring should be part of the design from the start. If you are already rebuilding, the cheaper repair is almost always the ring. The clearance tables behind those numbers are published in the seal catalogues from Trelleborg, and comparing your gland against a published table takes a few minutes.
8. Side load and misalignment
A rod that is not concentric with its load puts the entire sealing force on one arc of the lip. Wear appears as a crescent, not a ring, and the cylinder leaks at one clock position. Causes include worn rod bearings, bent rods, frame distortion, and mounting bolts that were tightened without alignment.
Check rod runout with a dial indicator over the full stroke. A deviation above about 0.05 mm per metre is enough to halve seal life on a long-stroke cylinder. No seal profile compensates for side load; correcting alignment does.
9. Pressure spikes and shock loads
A system rated at 200 bar can see 350 bar for a few milliseconds when a valve closes against a moving load. Those spikes extrude seals that are perfectly rated for the steady-state pressure, and they fatigue the elastomer until it cracks. The evidence is a seal that fails early with a brittle, shattered edge and no wear pattern at all.
Look for a relief valve set too high or responding too slowly, an accumulator that has lost precharge, and valve shift times that are faster than the system can absorb. Adding a cushion or slowing a spool costs less than the seal replacements it prevents.
10. Installation damage and wrong assembly
Spiral cuts across the lip, a lip rolled inside out, a seal stretched over a threaded rod end without a sleeve, or a seal driven in with a screwdriver: all leave marks that look like manufacturing defects and are not. A seal damaged at installation typically fails within hours to a few days.
Three habits prevent it: cover threads and splines with tape or a fitting bullet, lubricate with clean system fluid, and confirm the lip is seated around the full circumference by feel before closing the gland. If a cylinder leaks immediately after a rebuild, assume installation damage before assuming a bad part.
The 30-Minute Inspection That Finds the Cause
When a seal fails early, spend half an hour before ordering a replacement. The sequence below identifies the cause in most cases and takes no special tooling beyond a caliper, a dial indicator and a sample bottle.
| Step | What to do | What it rules out |
|---|---|---|
| 1 | Photograph the seal, in place and after removal, before cleaning | Loses no evidence to handling |
| 2 | Measure cross-section against a new part, note growth or shrinkage | Chemical incompatibility, compression set |
| 3 | Inspect the lip for nibbling versus uniform wear versus cuts | Extrusion, normal life, installation damage |
| 4 | Measure gland clearance and groove depth | Extrusion, over-squeeze |
| 5 | Check rod runout over full stroke with a dial indicator | Side load and misalignment |
| 6 | Inspect wiper and breather condition | Ingress contamination |
| 7 | Pull an oil sample for particle count and water content | Fluid degradation, abrasive contamination |
| 8 | Log fluid temperature at the cylinder under load | Over-temperature |
In our experience, step 3 alone identifies the cause in roughly seven of ten cases. Steps 4 to 6 tell you whether the fix is a part, a repair or a procedure.
Key Takeaways
- Read the damage pattern before ordering a replacement. The appearance of the lip narrows the cause faster than any data sheet.
- Contamination, not material quality, is the most common root cause, and the wiper is the part that lets it in.
- Nibbled edges mean extrusion: check clearance and fit a backup ring rather than a harder compound.
- Crescent-shaped wear means side load. Replace the guide element or correct the alignment; the seal is a symptom.
- Hard, cracked lips mean heat, and heat is measured at the gland, not at the tank.
- Seals that fail within days of a rebuild were almost certainly damaged during installation.
- Three failures in a year across different cylinders point to the fluid, not to the seals.
If the cause is unclear after the inspection, send us the failed seal, the gland dimensions and the fluid data. Our rod seal range and high and low temperature seal range cover the profiles most often involved, and a rebuild kit for the cylinder in question usually resolves the problem permanently once the root cause is corrected. The cylinder seal kit guide covers how to specify the full set so that one worn wiper does not turn into a second rebuild six months later.